Easy tutorial for making a DIY dry erase board from an old photo frame – and converting it into a stylish desktop organizer. Affiliate links in post.
A somewhat recent – and completely irritating – discovery I have come to learn is that my brain is riddled with ADHD. Which explains a lot.
My mother was diagnosed a few years ago, so I knew the ways it presented in her. However, as someone who performed well academically and, post-school, was constantly busy (apprenticeship, soul-sucking office work and eventually traveling) I never really sat still long enough to notice those traits in myself.
Sure, I was messy – but aren’t most creatives? Plus, when I first got to Australia, I was au-pairing from 6am-9am, then running to work for the 12pm-8pm shift Monday to Friday. Who had time to clean? And that constant rushing was why I found it hard to be organized and focused, right?
Well. Lockdown really forced me to sit still within a confined space – and it was a struggle.

My boyfriend at the time encouraged me for months to get assessed for ADHD because I was constantly overwhelmed. (And accidentally leaving my keys in the front door was becoming a low-key habit.) Everything was difficult and disorganized; I was getting crying-before-my-shift level anxiety before work because I was so worried about forgetting something important.
Side note: finance, where there are constantly rate and regulation changes? Not for me.
The point of this (admittedly long-winded) intro is, I suppose, to explain why I enjoy organizational tools so much. Having somewhere to visually project and arrange my thoughts is something I find really beneficial.

This is one of the reasons that I’ve sworn by bullet journaling for years!
However, one of the ways that I am trying to improve the aspects of my life that I find challenging is by removing additional barriers.
Truth be told, I’m not lazy – but I am forgetful and, if a task seems too overwhelming, (read: has more than 3 steps, means there will be a clean-up or requires me to sit still and concentrate for more than 20 minutes) I will either procrastinate or start, get distracted and rapidly stop.
To battle this, I am trying to simplify all of the daily tasks that I struggle with. Case in point?
I definitely need an organizational tool, like bullet journaling, to help me stay on top of my day-to-day life. (Especially with blogging.) My brain simply cannot do it innately – at least not effectively. That being said, I struggle to maintain my journal consistently at times – so how can I simplify the planning process for myself? Let’s take a look.
The Issues I Have With Bullet Journalling:

- I really enjoy and benefit from bullet journaling as an organisational tool. It’s a visual reminder of my tasks – and the act of physically sitting down, writing and creating a spread engages my brain.
- However, the time it takes to create a bullet journal spread is off-putting. Not to mention – is it going to look cute? Do I have a theme? What if I try to draw something cute and it fails, but it’s taken twenty minutes for me to fail and now I’ve wasted that time? Or I draw something cute, but by the time it’s finished I’ve forgotten what I need to note down?
- There’s also an element of permanence with a journal. I have to write in set goals, set plans, set dates. Once it’s written, I can scribble it out – but then it just gets confusing. This isn’t practical for things like daily to-dos, which may need to change as the day goes on, or spreads like my monthly post calendar.
- Bullet journalling relies on me remembering to check, open and read my journal.
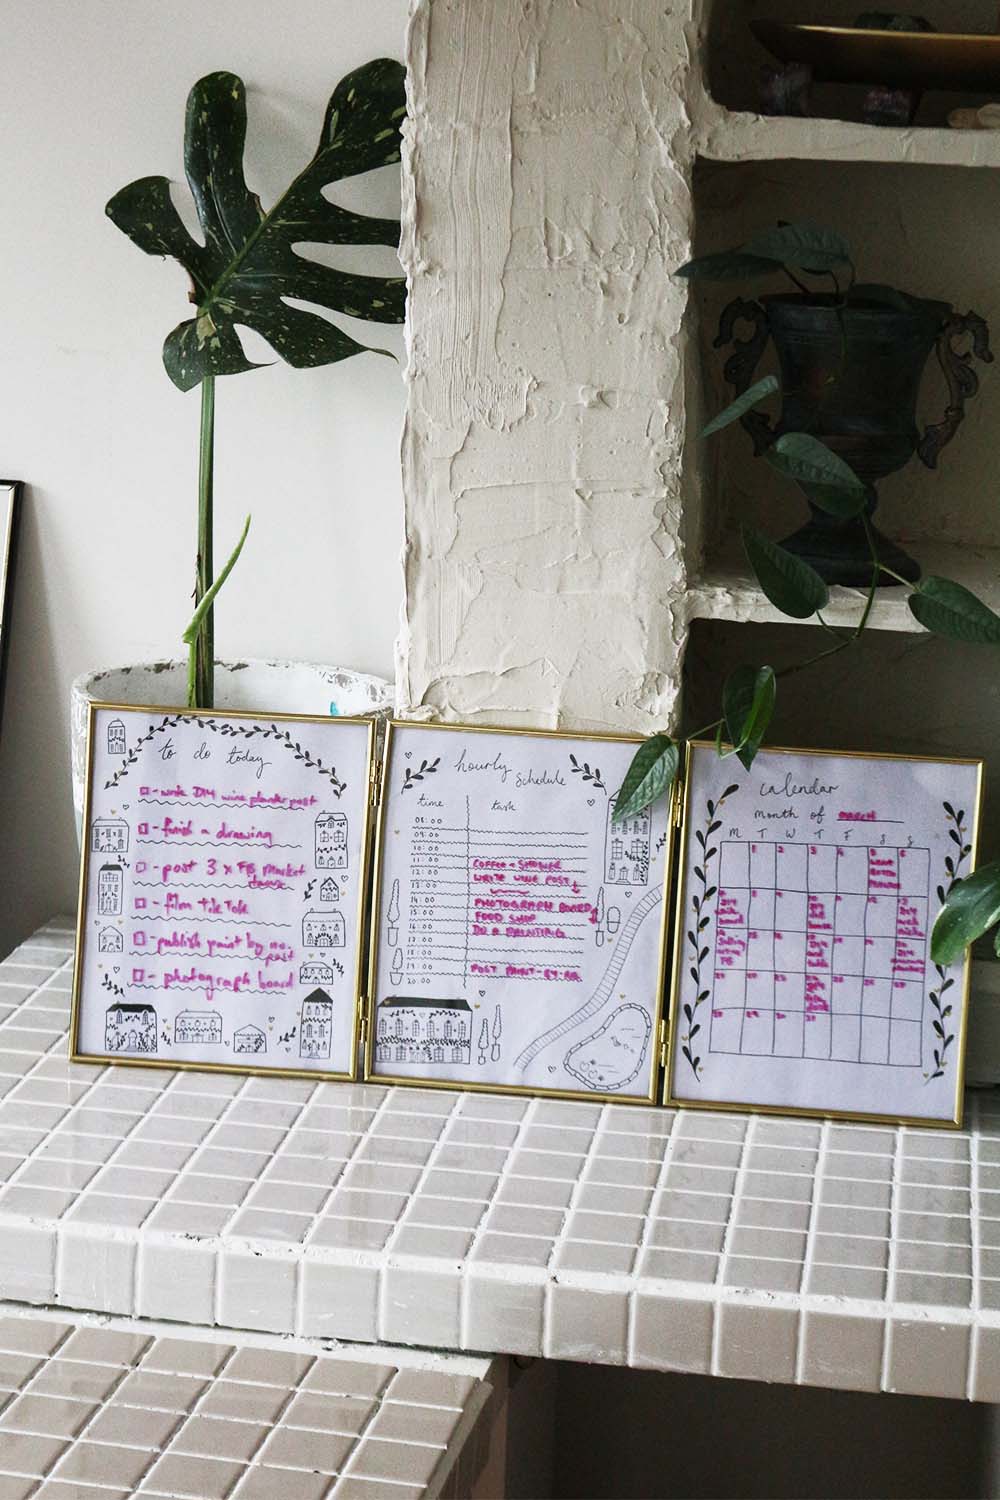
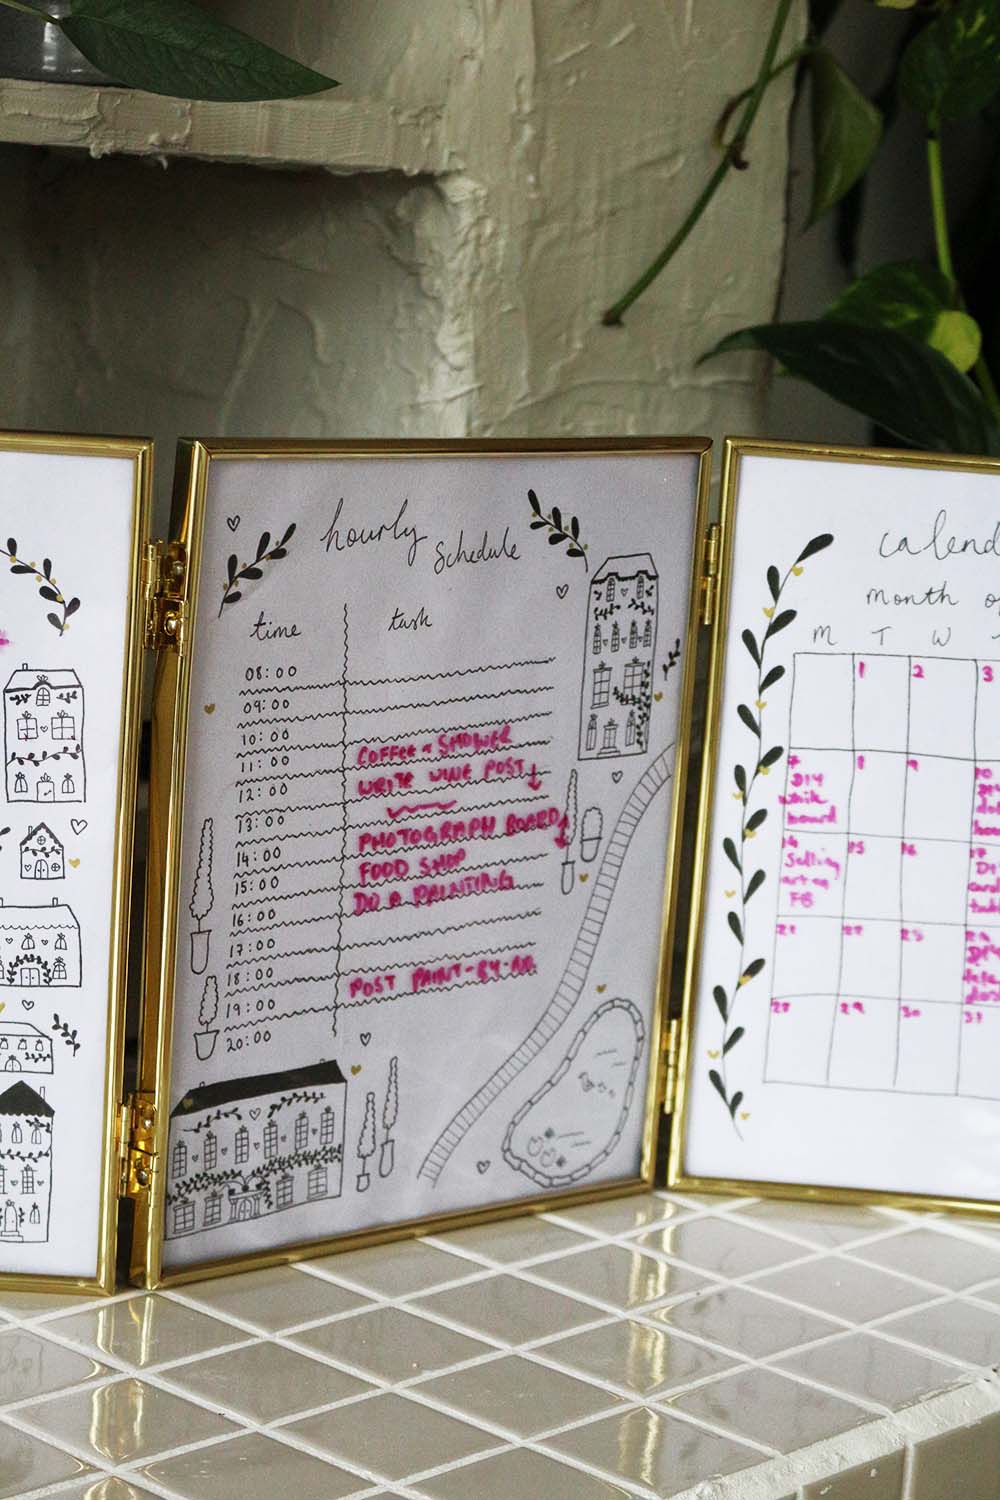
How I Use My DIY Dry Erase Whiteboard Organiser To Remove These Barriers:
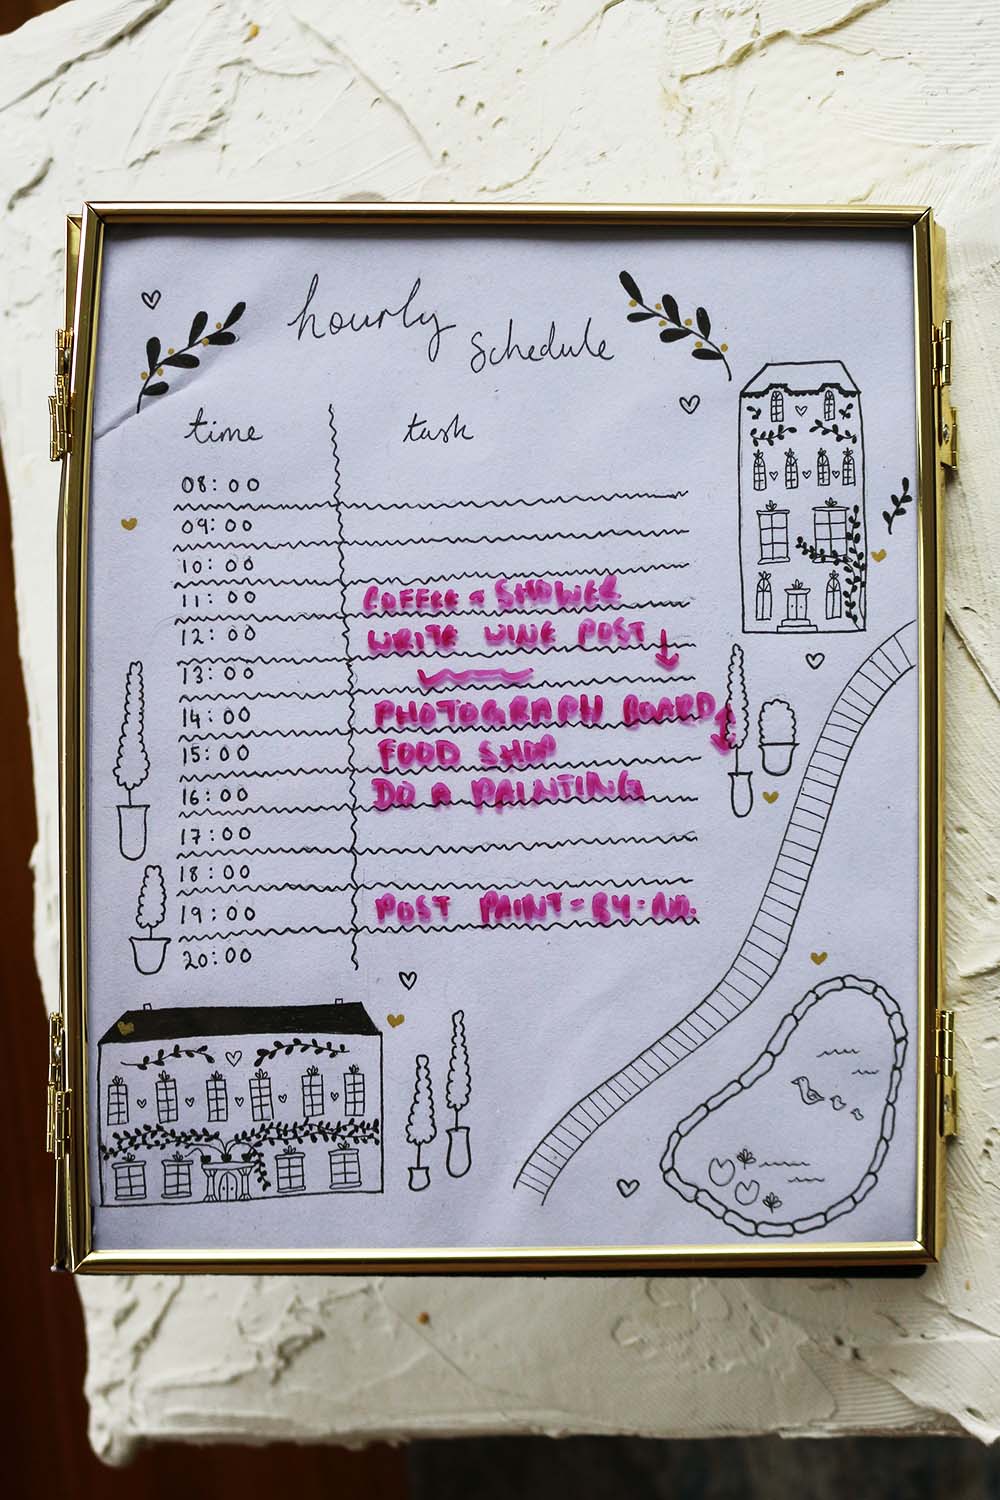
- A whiteboard is a large visual reminder that I can’t miss within my workspace. I don’t need to open it and I can immediately see my to-dos and daily schedule at a glance.
- The design is pre-made, so all I have to do is spend 5 minutes each morning adding my daily to-dos and filling in my hourly schedule. Not only is it quick – it’s easy. Just a few scribbles, no more effort necessary.
- It’s dry-erase, so I can change my goals/schedule as and when I need. Initially planned a thrifting day, but it started raining? Easy – all I have to do is rub off the pen and rewrite out my new goals for the day! Personally, I find scribbles visually distracting, so even the paper pad sets you can rip off and use each day aren’t quite for me.
- There’s no paper waste to clutter up my desk.
All in all? It’s a bloody fantastic system! I’ve been using it for a few weeks to organize my blog content and daily tasks. After the initial set-up, it’s been a really low effort but high-efficiency system for me. So shall we get into how to make it?

You Will Need:
- A multi-linked photo frame – I actually thrifted mine, but here’s a similar one!
- Paper
- Fine liner pens
- Pencils
- Whiteboard pens
Other than the frame, I already had all of these supplies at home – so this was a wonderfully cheap thrift flip!
How To Make A DIY Dry Erase Board From A Photo Frame:
Enjoy video tutorials? Check out my TikTok tutorial below!
- Cut your paper down to the size of your photo frame.
- Using pencil, loosely sketch a design for each of the panels. I chose a monthly calendar, daily to-do list and hourly task breakdown.
- Optionally, add illustrative detailing to these panels.
- Once you’re happy with the designs, use fineliner to finish and erase any pencil marks.
- Add these designs into your photo frame.
And that’s it! You can use whiteboard marker on the glass as if it were a normal whiteboard.
I’m so sorry – while I really wanted to scan these designs and make them downloadable for you guys, my printer has died its final death. However, you could easily use one of Canva’s free list templates – or create your own quirky designs!

That being said, I do have a few other printable designs you could use available in my Etsy store!

With that, I think we can end today’s post! I hope you enjoyed this idea as much as I have – it’s a really easy and practical thrift-flip, so I definitely recommend recreating it at home! Let me know your thoughts in the comments below . . .
Check out my Youtube:
Follow me on Insta:
Need more inspo? Check out my Pinterest
https://www.pinterest.com.au/miasdiyprojects/diy/Pin me!

This sounds like it’s been amazingly beneficial for you in keeping your organized! What a bloody fantastic idea; if I was crafty enough, I’d love to try something like this myself!
Thank you for reading, Jenny! It’s been a total game changer for my organisation!
This would be great for me too. I like to daily lists of things that need to get done. This idea is so much prettier than using scratch paper for sure 🙂
Shauna
http://www.lipglossandlace.net
Thank you for reading, Shauna! It’s definitely handy for daily to-do lists 🙂
These came out great. I am so bad at crafts and at keeping an agenda. I buy them and then forget to use them LOL. It is great that you can make these and that they are helpful to you.
Allie of
http://www.allienyc.com
Thanks for reading Allie 🙂 I definitely get that lol – that’s me with diaries!
This is great for me, i use hand mand special notepads and wonderfull pencils. I recomend them.
My blog : yihhu
thanks for reading!
This is such a genius idea! I never would have thought of doing this before but it makes so much sense as you can use the same daily template again and again, and save paper! Thanks so much for sharing this tutorial.
Thank you for reading, Sophie! 🙂
Thanks for sharing such a great idea! Looking forward for the next post.
Diana
http://www.ferbena.com
Thank you, Diana! 🙂
This is a great idea! Time has always put met off bullet journalling. I would never sit down to create lovely journal templates!
Corinne x
Thanks for reading, Corinne! x
I love the idea of having a bullet journal, but I don’t have the time to sit down & make the spreads. I could definitely use the dry erase boards in my life for the to do list & the monthly calendar!
I totally get that! The dry-erase board is a super time saving alternative 🙂